2019 exam study guide
Know the address of your class site: 10 points
To create a new document in Photoshop go to File>New
To move type or shapes on a layer you should select the desired layer and select
the Move Tool on the Tools Palette
To create the correct Photoshop workspace for this class, go to
Window>Workspace>Essentials
To type words on a new Photoshop layer, select the Typing Tool
and click once in the document window
To resize an image in Photoshop, go to Edit>Transform>Scale or Edit>Free Transform.
If you do not see handles on the resize box, go to View>Fit on Screen.
When the image is the size you want it, click on the check mark in the Options Bar to
apply the transformation. If the transformation is not what you want, click on the cancel button.
When you have resized type or a custom shape, click on the check mark
in the Photoshop Options Bar to Apply the Transformation or press the enter
or return key on your keyboard.
The best way to open a JPEG (JPG) or any image file in Photoshop, is
drag the jpeg file icon to the desktop and then onto the Photoshop icon or
into the Photoshop document you already have open and are working in.
Double clicking a JPEG file is not the best way to open this file to work on it in Photoshop.
Explain how to place an original document such as a photo or scan into a new
Photoshop document.
The process is:
1. Create the new Photoshop document. Be sure you see your layers palette.
If you do not, go to Windows>then check Layers. 2. Open the original photo or
scan by dragging it onto the Photoshop icon in the Dock. 3. Click and hold on the
original photo or scan in its layers palette. 4. Drag it into the new document.
In the layers palette, the two the visual clues that tell you a layer is visible and active
are: 1. you see an eye, and 2. that the layer is highlighted blue.
You make a layer invisible by clicking once on the eye on that layer.
You can make it visible again by clicking on the blank space where the eye was originally.
To select a type layer so that you can change the color of the type
on that layer, double click on the uppercase “T” in the layers palette.
Explain how to choose a filter in Photoshop. Go to Filter and select the filter you want
To resize an image in proportion in Photoshop, select the image.
Press and hold Shift on the keyboard. Drag up or down diagonally from a corner handle.
To make a levels adjustment layer in Photoshop,
go to the adjustment layer icon. Then go to Levels.
The white slider icon on the levels histogram makes an image lighter.
The black slider icon on the levels histogram a makes an image darker.
Draw the move tool
Draw the magic eraser tool
What tool in the Photoshop Tool bar tells you what color you will be using
if you choose the paint bucket tool? Foreground color picker
The usual color mode we use in Photoshop is RGB
What is the menu bar option that assures that you can always
auto select a layer if you click on it in the Photoshop document you are
working on? Check Auto Select>Layer in the Photoshop Options bar.
When you have an SD card inserted in the slot on the back
of your computer and the SD icon is showing on your desktop,
to remove it you should click on it and hold as you drag it to the
trash can icon at the bottom of your computer screen.
The trash icon turns into an eject icon and you drag the SD icon on top of it
and let go of your mouse. When the SD card icon disappears on your desktop,
you can take the SD card out of the back of the computer.
Before you can resize an image in Photoshop, particularly on that has a large
X across it you may need to rasterize it. To do this you should go to
Layer>Rasterize>All Layers
Remember to be sure you have high resolution photos.
That’s a resolution of 1000 pixels or more. In Google Images,
hover over the image to see the resolution.
When using the rule of thirds, important compositional elements
should be placed near the imaginary lines and points and where the lines intersect.
In this class, when you have finished a Photoshop document,
it is the best practice to save it in your computer’s documents folder
and then into a Google Drive folder
To create a new document in Photoshop, go to File>New
After opening a photo in Photoshop, add a copy of the background layer by
pressing Com + J
The preferred Photoshop workspace for this class is
Window>Workspace>Essentials
In Photoshop, for this class, you should go to Window in the Photoshop menu bar and be
sure you have checked Layers, Tools, Application Frame and/or Application Bar
Portfolios (see links below also)
Having an online portfolio and a traditional one showing actual printed
images is best, but an online portfolio is best if you have only one to show your work
When deciding what should be included in your portfolio, your first
consideration should be your audience
Your portfolio should show only your best work
About 8-12 photos should be in your portfolio
Our preferred search engine in this class is Google Chrome
Digital Art
Surrealistic Room project
This project was based on an art movement called Surrealism, which is
could be described as "dream-like"
We used the the Magic Eraser Tool to cut out solid areas
of the background of an image
We used the Magic Wand Tool to select a square in the
Surrealistic Room project
When this area was selected, we pressed delete on our leyboard
When the area was deleted, we went to Select>Deselect
To place an image in this empty space, we used the Move Tool to drag it
where we wanted it to go
Usually this image would need to be resized
The image would also usually need to be rasterized
photography begins
http://hillwoodphoto2.blogspot.com/2014/08/photography-begins.html
Use these two links to answer questions about cameras
and photography
https://www.phototraces.com/b/parts-of-a-camera/
https://www.phototraces.com/
Digital Single Lens Reflex Camera (DSLR)
parts of a camera (this is only part of the Photo 2 exam)
This is a DSLR camera diagram from the internet in Google images.
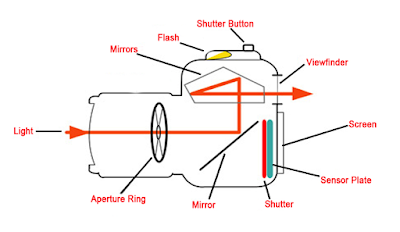
The lens aperture is located inside of the lens and adjusts to control the amount of light that passes through the lens and into the camera.
The aperture has different levels, which are called “f stops.” Think of f stops as fractions. Which piece of pizza is larger, 1/2 or 1/4? So which is a larger aperture in terms of the size of the opening width, f/2 or f/4?
Which lets in a larger amount of light, f/2 or
f/4?
The shutter is located inside the body of the camera. Its job is to block the light coming into the camera through the lens from reaching the camera’s image sensor. The shutter release button controls the shutter. Once you press this button, the shutter opens, allowing the light to strike the image sensor and capture the desired image.
The shutter controls the length of time light is allowed to strike the image sensor.
The shutter speed is how long the shutter stays open. It is also fractional. A shutter speed of 1/500 is one five-hundreth of a second. A shutter speed of 1/60 is one sixtieth of a second.
The image sensor or camera sensor is located in the body of the camera. It is the sensor that detects the light and records it to create your image. The sensor measures the intensity of light hitting the sensor as the shutter opens. The sensor is made up of individual units, which are called pixels. Each pixel measures the intensity of light by detecting the number of photons that reach the pixel. This information is relayed to the camera as a voltage value which can then be recorded by the camera.
The viewfinder is the device that allows you to see your subject through the camera and compose your image.
Memory Card
The memory card is where the camera stores all of the data from the images it captures. The card can then be removed and the data accessed by a computer.
Most cameras will use what is known as an SD card, which Secure Digital Card. An SD card is a small removable memory card that emerged out of a group of memory cards that hit the market when digital cameras first came of age.
Exposure
How important is exposure in photography? What are the components of exposure? What is the “Exposure Triangle”? These are the questions I will attempt to answer in this photography basics article about ISO, Aperture and Shutter Speed – the components of achieving a properly exposed photo.
What is Exposure in Photography?
You might have read or heard the photography term a “well-exposed photo”. This means a photo that was taken with just the right amount of light allowed to enter the camera. Analogically, an “underexposed photo” is one where an insufficient amount of light was allowed to hit the image sensor and an “overexposed photo” is one where too much light was let in.
In simple terms, exposure in photography is the amount of light, you as a photographer, allow to reach camera sensor or film. Exposure determines how bright or dark your photographs appear.
So in a darker scene, you would want a bigger aperture and in a brighter – a smaller. So far it seems pretty straightforward.
Shutter Speed and Exposure
You can change the time this curtain stays lifted. That’s what we call “shutter speed”. The longer the sensor is exposed, the more light will get in. Choosing a higher shutter speed, we double the amount of light that gets to the sensor.
Now you know what “long exposure” means. It’s a shutter speed setting at which the sensor stays exposed for a long time. Long exposures are used when there is not enough light for example at sunset times or during the night.
Controlling Motion With Shutter Speed
But, just like with aperture, things are not that simple. Shutter speed doesn’t just influence the amount of light that hits the sensor. It also changes the way motion is captured.
Higher shutter speeds such as 1/500 and above allow us to freeze the object. A running person will appear perfectly sharp. But if we choose a low shutter speed, his movement will look blurred in the final photo.
Here we can’t really say which exposure was “correct”. Sports photographers do need to freeze the action (we want to see which football player kicked the ball, right?) but blurred motion is often used deliberately to create a sense of dynamics or to make the final image more compelling.
A very good example, traditionally exploited by landscape photographers, is blurring water. Water shot at low shutter speeds acquires a very soft, milky look that is especially eye-pleasing. At such low speeds, any movement of the camera will blur the object in focus so the use of a tripod is obligatory.
ISO
ISO is a photographic concept that originated in film photography but was later translated to digital cameras too. However, ISO works in different ways in both types of photography.
ISO in Film Photography
In film photography, ISO is a number that defines how sensitive to light a particular roll of film is. Lower ISO numbers like 50 or 100 mean the film is not very sensitive to light. These types of film are perfect for shooting on a bright and sunny day outside. Analogically, higher ISO numbers mean films that are more sensitive to light. They are suitable for shooting indoors or in low-light conditions outside.
It’s a well-known fact that less sensitive films produce better quality photographs. This is due to their emulsion.
As you know, the emulsion of a film consists of light-sensitive layers of silver halide crystals that capture light. The higher the ISO, the larger and coarser these crystals are. They need to be such in order to record light more quickly and allow for using faster shutter speeds. However, they also create more grain. Lower ISO films, on the other hand, have emulsion with a finer crystal structure so they produce smoother photographs.
ISO in Digital Photography
“Lower equals smoother” is a rule that you can follow even if you only shoot digital. In digital photography, the ISO value can be changed very easily from the menu (you do not need to change films which is what film photographers do to increase or decrease light sensitivity). Depending on the model of your digital camera, you may have a choice of ISO ranging from 50 up to 409,600.
On a bright day outside ISO 100 is usually a great choice. But as the day advances, you’ll need to increase it to 200 and then 400 or more. If you shoot indoors, you will usually have to choose an ISO up from 200-400.
It’s important to know, though, that you never make your sensor more or less sensitive to light by choosing higher or lower ISO. Your camera always captures light at ISO 100. Then, depending on the ISO value you’ve selected from the menu, it increases its brightness.
For example, if you’ve selected ISO 200, it will increase the brightness of your photo twice. If you have selected ISO 400, you’ll increase it three times and so on. In digital photography, this is called “gain”.
Just like in films, lower ISO settings produce images of better quality. That’s because the more our camera increases the brightness of the photo to match the high ISO we’ve selected, the
Just like in films, lower ISO settings produce images of better quality. That’s because the more our camera increases the brightness of the photo to match the high ISO we’ve selected, the more noise it creates. Colors also suffer at high ISO settings. They don’t appear as saturated as at lower ISO settings.
There’s nothing to worry about at ISO up to 800 but after that, the quality of the image begins to gradually worsen. (This is strictly camera-specific, so some cameras can produce more noise at ISO 800 than others.)
So, if you can shoot with a lower ISO. But compared to Aperture and Shutter Speed, ISO is the least creative component of the triangle. It only affects the brightness and general quality of the image but it doesn’t change the way your object looks like dramatically.
A change in aperture or shutter speed, on the other hand, may produce a brand new picture.
You may bookmark any of the following links on your computer
green screen photography
https://stevecampbellhillwood.blogspot.com/2019/11/green-screen-photography.html
portfolios
http://annetteschreiberphotography.com/importance-photographers-portfolio_1/
From the link above, answer these questions. They are on the exams, except for Digital Art.
Which type portfolio is best, a traditional one showing printed photos or an online portfolio?
____________________are best, but an ___________________ __________________________is preferred.
When deciding what should be included in your portfolio, your first consideration should be your_____________________.
Your portfolio should show only your ______________ ________________
About how many photos should be in your portfolio? _______ to _________.
photoshop
https://digital-photography-school.com/using-levels-photoshop-image-correct-color-contrast/
help for many topics
Using SD cards
http://hillwoodphoto1.blogspot.com/2018/08/sd-card-reader-slot.html
Phone to computer
http://hillwoodphoto1.blogspot.com/2018/08/transfer-photos-from-phone-to-computer.html
email a photo
http://stevecampbellhillwood.blogspot.com/2015/11/saving-as-jpeg.html
Multiple windows open, use F3 key
Photoshop tools
Using Photoshop Tools
Photoshop BootCamp
Making a new folder
Pasting an image into photoshop
resizing an image in Photoshop
cutting out part of a photo in Photoshop
using an eraser tool in Photoshop
create a G mail account and blog
make folder in Google drive
organize files in Google drive
placing a folder from computer into a Google Drive folder


