What I Want You to Know or Do:
Create a new document in photoshop according to written specifications
Capture high resolution digital images
Place digital images in a Photoshop document according to written instructions
Move and resize digital images on separate Photoshop layers
Add blending modes and filters to Photoshop layers
Type text on layers
Standards
3.Students will integrate reading, writing, math, and science skills and understand the impact of academic achievement in the workplace.
4.Students will relate and apply artistic knowledge, skills, techniques, processes and strategies for the creation of design, photographic, web, print, and various digital projects.
6.Students will produce creative and artistically pleasing media for use in various applications for advertising, internet, film, entertainment, and marketing communications.
10.Students will develop e-Skills that are flexible and evolve with the increasing demands of technology developments and business needs, helping students become life-long learners.
11.Students will demonstrate skills that are employable and desirable to a rapidly changing industry that demands innovation.
copying photos onto layers
working with the layers palette
directions
open photoshop
go to window>workspace>essentials or design (for CS5)
go to file>new>name: type your name_photoshop collage 1
width: 14 inches (not pixels)
height: 11 inches
resolution: 300
color mode: rgb
background contents: white
click OK
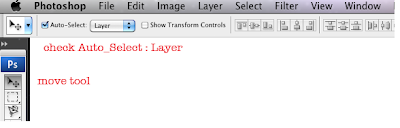
be sure you check Auto-Select Layer
2. Get the jpeg images onto your desktop. Sometimes you will download the images. Sometimes you will click, hold and drag the image onto your desktop. Sometimes you must click twice or 3 times to get a high res image. or on one of the images and drag it to the desktop. Remember: At caedes.net, click on a photo, select one of the high resolution images and drag it to the desktop.
3. Drag it onto the Photoshop icon in the dock to open it.
4. Copy it into the new Photoshop document>Click and hold on the layer thumbnail>Drag it into the new Photoshop document.
Note: In CS5, your image layer thumbnails may have an X over them. If they do, click on the check mark in the Options Bar, then go to Layer>Rasterize>Smart Object
5. Resize: Go to Edit>Free Transform and resize the image to fit in the document. Hold down Shift to resize in proportion. Click the check mark when you have what you want or the cancel button if it’s not what you want.
6. Go to File>Save. Be sure you are saving into your folder.
Repeat
1. Repeat steps 1-6 above and create 4 layers with a new photograph on each layer.
Resize all of the images to make them fit in the new document.
2. Double click on the Background layer. Click OK at the New Layer window.
3. Go to the Paint Bucket Tool and make the background black.
4. Save the document and tell me when you are finished.
Remember that you can turn off the eyeballs on Photoshop layers to simplify what you are doing to each layer.
Your grade will be based on:
1. Correct document size and specifications (25 points)
2. Seven photos on five layers (25 points)
3. Photos resized to fit layout (25 points)
4. Background color correct (25 points)


