brush tool to trace over photo
layer mask

Sunday, March 29, 2015
Thursday, February 26, 2015


Thursday, February 12, 2015
photoshop quiz 1_feb 2015
What I Want You to Know or Do:
1. Capture high resolution digital images
2. Place digital images into a Photoshop document according to written instructions
3. Move and resize digital images on separate Photoshop layers
4. Add blending modes and filters to Photoshop layers
Standards
3.Students will integrate reading, writing, math, and science skills and understand the impact of academic achievement in the workplace.
4.Students will relate and apply artistic knowledge, skills, techniques, processes and strategies for the creation of design, photographic, web, print, and various digital projects.
6.Students will produce creative and artistically pleasing media for use in various applications for advertising, internet, film, entertainment, and marketing communications.
10.Students will develop e-Skills that are flexible and evolve with the increasing demands of technology developments and business needs, helping students become life-long learners.
11.Students will demonstrate skills that are employable and desirable to a rapidly changing industry that demands innovation.
Help with Photoshop
copying photos onto layers
working with the layers palette
directions
Make a folder on your desktop, titled your name_photoshop quiz 1. Keep all photos and files in this folder.
open photoshop
open photoshop
go to window>workspace>essentials or design (for CS5)
go to file>new>name: type your name_photoshop quiz collage 1
width: 11 inches (not pixels)
height: 7 inches
resolution:300
color mode: rgb
background contents: white
click OK
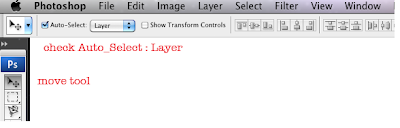
be sure you check Auto-Select Layer

1. Find high resolution images
or....not copyright free
or....use Google images...be sure they are high resolution
2. Get the jpeg images onto your desktop. Sometimes you will download the images. Sometimes you will click, hold and drag the image onto your desktop. Sometimes you must click twice or 3 times to get a high res image. or on one of the images and drag it to the desktop. Remember: At caedes.net, click on a photo, select one of the high resolution images and drag it to the desktop.
Questions:
1. What are the minimum dimensions of a high resolution image? (Hey, we're about math!)
2. What are 2 ways you be sure the image is high res?
2. Get the jpeg images onto your desktop. Sometimes you will download the images. Sometimes you will click, hold and drag the image onto your desktop. Sometimes you must click twice or 3 times to get a high res image. or on one of the images and drag it to the desktop. Remember: At caedes.net, click on a photo, select one of the high resolution images and drag it to the desktop.
3. Drag it onto the Photoshop icon in the dock to open it.
4. Copy it into the new Photoshop document>Click and hold on the layer thumbnail>Drag it into the new Photoshop document.
Note: In CS5, your image layer thumbnails may have an X over them. If they do, click on the check mark in the Options Bar, then go to Layer>Rasterize>Smart Object or All Layers.
5. Resize: Go to Edit>Free Transform and resize the image to fit in the document. Hold down Shift to resize in proportion. Click the check mark when you have what you want or the cancel button if it’s not what you want.
6. Go to File>Save. Be sure you are saving into your folder.
Finish
1. Repeat steps 1-6 above and create 5 layers with a new photograph on each layer.
Resize all of the images to make them fit in the new document.
2. Double click on the Background layer. Click OK at the New Layer window.
3. Go to the Paint Bucket Tool and make the background black.
Add a different filter to 3 photos
Add a different filter to 3 photos
4. Save the document and tell me when you are finished.
Remember that you can turn off the eyeballs on Photoshop layers to simplify what you are doing to each layer.
Your grade will be based on:
____Correct document size and specifications
____Auto select layer is checked
____All images are high res
____All layers rasterized (Layers>Rasterize>All Layers)
____Five photos on five layers
____Use move tool
____Photos resized to fit layout (Edit>Free Transform. Press and hold shift key>Drag from corner>Check mark)
____Different filter on 3 layers
____Background color correct
____Work saved into folder on desktopSunday, February 1, 2015

Tuesday, January 27, 2015
photoshop collage
SSA
• It's going to be cold and it's going to be hot
• Dress with that in mind
• I will report non-SSA

What I Want You to Know or Do:
1. Capture high resolution digital images
2. Place digital images into a Photoshop document according to written instructions
3. Move and resize digital images on separate Photoshop layers
4. Add blending modes and filters to Photoshop layers
Questions:
1. What are the minimum dimensions of a high resolution image? (Hey, we're about math!)
2. How can you be sure the image is high res?
Standards
• It's going to be cold and it's going to be hot
• Dress with that in mind
• I will report non-SSA
What I Want You to Know or Do:
1. Capture high resolution digital images
2. Place digital images into a Photoshop document according to written instructions
3. Move and resize digital images on separate Photoshop layers
4. Add blending modes and filters to Photoshop layers
Questions:
1. What are the minimum dimensions of a high resolution image? (Hey, we're about math!)
2. How can you be sure the image is high res?
Standards
3.Students will integrate reading, writing, math, and science skills and understand the impact of academic achievement in the workplace.
4.Students will relate and apply artistic knowledge, skills, techniques, processes and strategies for the creation of design, photographic, web, print, and various digital projects.
6.Students will produce creative and artistically pleasing media for use in various applications for advertising, internet, film, entertainment, and marketing communications.
10.Students will develop e-Skills that are flexible and evolve with the increasing demands of technology developments and business needs, helping students become life-long learners.
11.Students will demonstrate skills that are employable and desirable to a rapidly changing industry that demands innovation.
Help with Photoshop
copying photos onto layers
working with the layers palette
directions
open photoshop
go to window>workspace>essentials or design (for CS5)
go to file>new>name: type your name_photoshop collage 1
width: 14 inches (not pixels)
height: 11 inches
resolution:300
color mode: rgb
background contents: white
click OK
be sure you check Auto-Select Layer
1. Find high resolution images
or....not copyright free
or....use Google images...be sure they are high resolution
2. Get the jpeg images onto your desktop. Sometimes you will download the images. Sometimes you will click, hold and drag the image onto your desktop. Sometimes you must click twice or 3 times to get a high res image. or on one of the images and drag it to the desktop. Remember: At caedes.net, click on a photo, select one of the high resolution images and drag it to the desktop.
3. Drag it onto the Photoshop icon in the dock to open it.
4. Copy it into the new Photoshop document>Click and hold on the layer thumbnail>Drag it into the new Photoshop document.
Note: In CS5, your image layer thumbnails may have an X over them. If they do, click on the check mark in the Options Bar, then go to Layer>Rasterize>Smart Object
5. Resize: Go to Edit>Free Transform and resize the image to fit in the document. Hold down Shift to resize in proportion. Click the check mark when you have what you want or the cancel button if it’s not what you want.
6. Go to File>Save. Be sure you are saving into your folder.
Repeat
1. Repeat steps 1-6 above and create 4 layers with a new photograph on each layer.
Resize all of the images to make them fit in the new document.
2. Double click on the Background layer. Click OK at the New Layer window.
3. Go to the Paint Bucket Tool and make the background black.
4. Save the document and tell me when you are finished.
Remember that you can turn off the eyeballs on Photoshop layers to simplify what you are doing to each layer.
Your grade will be based on:
1. Correct document size and specifications (25 points)
2. Seven photos on five layers (25 points)
3. Photos resized to fit layout (25 points)
4. Background color correct (25 points)
Monday, January 26, 2015
keychain login
http://support.apple.com/en-us/HT201609
OS X: Keychain Access asks for keychain "login" after changing login password
Learn what to do if Keychain Access asks for your keychain password after you've changed your login password.
If you change your account's password using your Mac OS X Install disc (or if your network-based account password is changed due to a network admin forcing a password change), your default keychain password (which uses the same initial password as your user account) does not change. Because of this, you will be prompted to enter a keychain password each time an application requires authentication that your keychain would normally provide.
Note: This doesn't happen if you change your account password using Accounts preferences.
If you want your default keychain to be unlocked automatically when you log in, synchronize your Keychain Access and account login passwords by doing this:
- Open Keychain Access (you can get to it by choosing Utilities from the Go menu in the Finder).
- From the Edit menu, choose Change Password for Keychain "login."
- Type the former password of the account that you are currently logged in to, then click OK.
- If you entered the correct password, a new window appears; enter the original password again in the Current Password field.
- In the New Password field, type the password that matches your current account password.
- Re-enter the newer password in the Verify field, then click OK.
If you don't remember your original (former) account password
If you don't remember your original password, you'll need to delete the keychain. Deleting a keychain also deletes all the password data saved in that keychain.
- In Keychain Access, choose Preferences from the Keychain Access menu.
- If available, click the Reset My Default Keychain button. This will remove the login keychain and create a new one with the password provided.
- If Reset My Default Keychain is not available, choose Keychain List from the Edit menu.
- Delete the "login" keychain.
The next time you log in to the account, you can save your current password in a keychain.
Thursday, January 1, 2015
jan 6_9 hand colored letters & safety
In this assignment you are going to hand color pre-printed letters using markers or colored pencils. You can create designs inside the letters or use just one color. Design is preferred.


What I want you to know or do:
1. Use markers and colored pencils to color inside at least one letter.
2. Make the colors rich and saturated......make them "pop"
Standards
6. Students will produce creative and artistically pleasing media for use in various applications for advertising, internet, film, entertainment, and marketing communications.
Your grade:
http://stevecampbellhillwood.blogspot.com/2013/02/art-master-rubric.html
classroom safety
review:
http://stevecampbellhillwood.blogspot.com/2012/08/classroom-safety-test-review.html
computer safety powerpoint
review:
http://stevecampbellhillwood.blogspot.com/2014/08/computer-safety-powerpoint.html
Subscribe to:
Posts (Atom)